Categories
In Version 1.5 we finally shipped Categories. Many users requested this feature, and we are happy you can all use it now. In this article, you will learn how to use categories in Writerie.
# Create a new category
To create a new category, you have two options. The first is to use the "New Category" link in the sidebar. You will get on a page, where you can enter the name of the category and also choose an individual color.
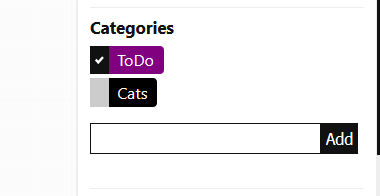
The other option is to create a new category directly in your document. If you open the document sidebar you will find a new section called "Categories", where you see all your existing categories, the one currently related to the document, and a field to add a new one.

# Assign a category to a document
To assign a category to a document, open the document of your choice, open the document sidebar and look for the categories section. All categories already assigned will be shown at the top of the list and will be marked with a check icon.
To assign another category, simple click on it and it will be automatically assigned. Once it is assigned, you can click again and remove it.
As always we try to keep our tips short. If you have any additional questions or a feature request, please feel free to reach out. Looking forward to hearing from you.
Happy Categorization and Happy Writing!